| 1. |
Preparing of leaf
image file: |
| |
To prepare leaf image file,
scan leaves individually on whether ultra black
or ultra white background(*). Then save the scanned leaf images
individually in (bmp 24 bit) files. Pay attention
to the scanner sittings because you will need to
calibrate the software according to these
sittings.
|
| 2. |
Calibration: |
| |
The software needs to be
calibrated before using.
Please see calibration procedure
|
| 3. |
Measuring procedures: |
| 3.1. |
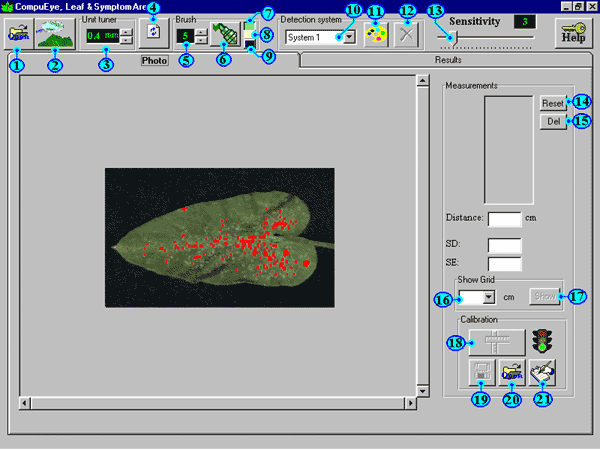
Use "Open" button (1)
to open the objective leaf file.
|
| 3.2. |
Set the detection
system |
| |
Since the colours of symptom
may be varied according to the plant species,
infestation stage or scanner...ext., the software
was provided with four built-in detection systems
(10) available to detect different types of
symptom colour. Examine them and choose the most
suitable one for your image colour.
To get the best accuracy, you
can customize your own system according to the
symptom colour in your hand. Please see customization
procedures.
Choosing "leaf area only" (The 1st
choice in the list 10) makes the software to not
detect any symptom on the leaf but presents leaf
area and leaf perimeter.
|
| 3.3. |
Adjust measurement
unit area |
| |
The principal idea of the
software is to divide the image into small
squares and assess the average colour of every
square. You can use the unit tuner (3) to adjust
the area of these square units between 0.1 and 1.0
mm2. Measurements of these square
units are carried out according to the visible
dimensions on the screen and are not carried out
according to the real dimensions of the object
target.
Although small detection unit makes measurement
more accurate, it consumes much time especially
in big images. So try to make your suitable
balance. |
| 3.4. |
Analyze image |
| |
Click "analyze"
button (2) to analyze the image and represent
leaf and symptom areas.
|
| 4. |
Correction and
improvement |
| |
The software marks the parts,
which are detected as symptom, by red colour.
That allows you to see the parts which are
detected and counted as symptom area. Sometimes
the software couldn't detect all the parts of the
symptom area or detect some parts of not symptom
and mark it as symptom.
Now here are some advises help you to correct
that confusion: |
| 4.1. |
Customize a specific detection
system paying attention to represent the average
colour of the symptom. Please see customization
procedures. |
| 4.2. |
Adjust detection sensitivity
You can use the sensitivity slider (13) to adjust
the detection sensitivity of the software. Moving
this slider to the right make the software to
detect wider range of colours around the typical
average of symptom colour. |
| 4.3. |
Paint confused parts |
| |
Sometimes, the leaf may
contains parts exhibit a colour similar to
symptom area. These parts may be mistakenly
marked as symptom area. To avoid this mistake:
| 4.3.1. |
Press "refresh"
(4) button to clear any marked areas. |
| 4.3.2. |
Use the brush tool (6)
to paint confused areas.
There are three colours available to
paint unrecognized or mistakenly
recognized areas:
(7) To paint colour similar to non
symptom area (leaf area)
(8) To paint colour similar to symptom
area
(9) To paint black colour to paint any
pale spot in the background (pale area
maybe recognized as leaf area).
Select the appropriate colour then press
brush button (6) and use it to paint
where is needed. |
After doing the required
corrections click "analyze" button (2)
to reanalyze the image once again.
|