The software
needs to be calibrated before using.
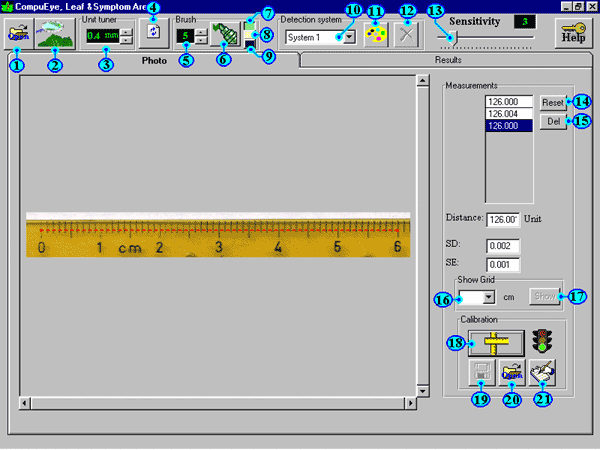
Calibration procedure:
1. Scan a conventional ruler using the same scanner
sittings, which you have used to scan the objective
leaves, i.e. resolution, size ratio ...ext.
2. Save the ruler image as bmp file.
3. Use "open" button (1) to open the ruler
image file which was saved in previous step.
4. Click the mouse exactly on 0 point on the ruler then
move the mouse and click on other point on the ruler
scale e.g. 6 cm. The covered distance will appear roughly
(Uncalibrated). To make it more accurate, repeat the
previous action with the same start and end points (i.e.
click on 0 point then click on 6 cm point). The average
of these measurements, SD and SE will appear to you.
Repeat this action until be satisfied with the average.
Use "Del" button (15) to delete inaccurate (irregular)
measurements and "Reset" (14) button to clear
all measurements.
This step is very important and seriously affects the
accuracy of the final results of the software therefore
make it carefully. To enhance accuracy, use as much
distance as it possible on the ruler.
5. Click on "calibrate" button (18), a
calibration form will appear. Put the exact length of the
measured distance and select or set the unit (mm, cm or
inch ext.). In our example, to put your scale in cm put
the distance as 6 and the unit as cm. To put the scale in
mm put the distance as 60 and the unit as mm and so on.
The calibration form was also provided with some fields
to save remarks concerning scanner sitting such as
resolution and size ratio. These remarks will help you to
save and reuse this calibration later.
2.6. Use button (19) to save current calibration.
Next time when you use the same scanner sitting you can
open and reuse the saved calibration via button (20).
Main window
|